实战5 - 亡灵召唤者
这次我们来看看一种令人毛骨悚然的敌对生物吧~
任务
制作一种新的怪物——亡灵召唤者
要求
- 亡灵召唤者的生命值为30,其余数值可以任意设置
- 亡灵召唤者生成时不携带任何装备
- 亡灵召唤者会使用下列两种攻击方式:
- 召唤2只僵尸仆从加入战斗。不同于普通的僵尸,僵尸仆从会优先攻击主人(召唤自身的亡灵召唤者)的攻击目标,不会在阳光下燃烧,并且主人误伤自己时不会反抗主人。僵尸仆从没有掉落物,而其余的属性与僵尸完全一样(但音效可以任意设置)。此攻击方式冷却时间为30s,冷却时只能使用第二种攻击方式。使用此攻击方式前主手会抬高,并且在主手处生成黄绿色粒子效果(参考HEX颜色代码:#898F61)。
- 面向自己的攻击目标连续发射3次凋灵之首,每次发射3个间隔30°的凋灵之首,每两次发射间隔0.6秒。前两次发射不会发射蓝色凋灵之首,但第三次发射时有可能全部替换为蓝色凋灵之首,且替换为蓝色凋灵之首的概率在简单、普通、困难模式下分别为0%、1%、20%。此攻击方式冷却时间为2s,使用此攻击方式前主手会抬高,并且在主手处生成黑色粒子效果(参考HEX颜色代码:#101010)。
- 亡灵召唤者攻击前会摆出类似唤魔者“施法”的姿势1秒,但只有主手会抬起“施法”。使用两种攻击方式前有不同的粒子颜色提示。
- 亡灵召唤者会主动攻击玩家和铁傀儡,也会优先反击攻击自己的生物(包括别的亡灵召唤者)
- 亡灵召唤者会游泳,空闲时会四处张望并随意走动
- 亡灵召唤者的音效、模型、材质和掉落物可以任意设置
提示
考虑到其攻击目标的特点,僵尸仆从应该是一种新的近战怪物,而不应该仅是普通的僵尸(类似暮色森林中巫妖的仆从)
Vec3中的yRot方法可以快捷地得到一个向量绕y轴旋转一定角度后的结果恼鬼会主动攻击召唤自身的唤魔者正在攻击的生物,可以看看恼鬼的AI是怎样写的
参考步骤 #1
我们先考虑僵尸仆从。
public class Minion extends Zombie {
    private static final String OWNER_UUID_TAG = "OwnerUUID";
    private UUID ownerUUID;

    public Minion(EntityType<? extends Zombie> type, Level level) {
        super(type, level);
    }

    @Nullable
    public Necromancer getOwner() {
        if (level().isClientSide()) {
            return null;
        }
        Entity entity = ((ServerLevel) level()).getEntity(ownerUUID);
        if (entity instanceof Necromancer necromancer) {
            return necromancer;
        }
        return null;
    }

    public void setOwner(@Nullable Necromancer owner) {
        if (owner != null) {
            ownerUUID = owner.getUUID();
        } else {
            ownerUUID = null;
        }
    }

}
这里在继承了Zombie类的基础上额外保存了主人的UUID,以便于区分僵尸仆从的主人是谁。存储主人的UUID是为了便于把主人的信息写入实体的NBT标签中。
下面是主人UUID的保存,别忘了检查UUID是否存在。
@Override
public void addAdditionalSaveData(CompoundTag tag) {
    super.addAdditionalSaveData(tag);
    if (ownerUUID != null) {
        tag.putUUID(OWNER_UUID_TAG, ownerUUID);
    }
}

@Override
public void readAdditionalSaveData(CompoundTag tag) {
    super.readAdditionalSaveData(tag);
    if (tag.hasUUID(OWNER_UUID_TAG)) {
        ownerUUID = tag.getUUID(OWNER_UUID_TAG);
    }
}
用下面的代码避免僵尸仆从在阳光下燃烧或召唤增援。
@Override
protected boolean isSunSensitive() {
    return false;
}

@Override
protected void randomizeReinforcementsChance() {
    Objects.requireNonNull(getAttribute(Attributes.SPAWN_REINFORCEMENTS_CHANCE)).setBaseValue(0);
}
重点考虑需要给目标选择器(targetSelector)添加的AI。先看addBehaviourGoals方法。
@Override
protected void addBehaviourGoals() {
    goalSelector.addGoal(2, new ZombieAttackGoal(this, 1, false));
    goalSelector.addGoal(7, new WaterAvoidingRandomStrollGoal(this, 1));
    targetSelector.addGoal(1, new HurtByTargetGoal(this, Necromancer.class));
    targetSelector.addGoal(2, new MinionCopyOwnerTargetGoal(this));
    targetSelector.addGoal(3, new NearestAttackableTargetGoal<>(this, Player.class, true));
    targetSelector.addGoal(4, new NearestAttackableTargetGoal<>(this, IronGolem.class, true));
}
其中MinionCopyOwnerTargetGoal是我们添加的AI,而这个类的大致结构与通常的TargetGoal的子类基本上是一致的(如果对TargetGoal的子类的基本结构有不熟悉的,可以参考VexCopyOwnerTargetGoal,不建议参考NearestAttackableTargetGoal是因为其过于复杂)。
省略canUse方法的代码如下。
public class MinionCopyOwnerTargetGoal extends TargetGoal {
    // (这一点1.2.1.3.3中提到过)TargetingConditions里forCombat和forNonCombat的区别在于forCombat会检查是否是和平模式以及target是否为队友,而forNonCombat不会
    //  ignoreLineOfSight和ignoreInvisibilityTesting的作用比较容易从名字中看出来,它们使僵尸仆从能够更加“无条件地”攻击主人的攻击目标
    private final TargetingConditions copyOwnerTargeting = TargetingConditions.forNonCombat().ignoreLineOfSight().ignoreInvisibilityTesting();
    // Necromancer是(将要讲到的)亡灵召唤者的类名
    @Nullable
    private Necromancer owner;

    public MinionCopyOwnerTargetGoal(Minion minion) {
        super(minion, false);
    }

    @Override
    public void start() {
        Objects.requireNonNull(owner, "Owner must not be null");
        asMinion().setTarget(owner.getTarget());
        super.start();
    }

    private Minion asMinion() {
        return (Minion) mob;
    }
}
而我们需要在canUse方法中判断主人的状态。
@Override
public boolean canUse() {
    if (asMinion().getOwner() == null) {
        // 没有主人
        return false;
    }
    owner = asMinion().getOwner();
    if (owner == null || !owner.isAlive()) {
        // 主人已经死了
        return false;
    }
    if (owner.getTarget() == null) {
        // 主人没有攻击目标
        return false;
    }
    // canAttack是TargetGoal中的方法,用于判断目标在copyOwnerTargeting的TargetingConditions下是否可以攻击
    return canAttack(owner.getTarget(), copyOwnerTargeting);
}
Minion类的其余部分基本上不需要改动(如果不自定义声音、掉落经验等的话),而Minion的渲染和僵尸只有材质上的区别,所以代码就不展示了。
到这里僵尸仆从的代码就写完了。
参考步骤 #2
注:“Necromancer”一词本身为“死灵法师”之意,笔者给此实体取中文名为“亡灵召唤者”而非“死灵法师”是因为上一实战中实体名称“骷髅法师”已经包含“法师”一词
接下来看最重要的Necromancer类。
public class Necromancer extends Monster {
    // 最大召唤冷却时间
    public static final int MAX_SUMMON_COOLDOWN = 600;
    private static final String SPELL_COLOR_TAG = "SpellColor";
    // 当前主手处粒子效果的颜色,默认值-1表示主手处没有粒子
    private static final EntityDataAccessor<Integer> SPELL_COLOR = SynchedEntityData.defineId(Necromancer.class, EntityDataSerializers.INT);
    private static final String SUMMON_COOLDOWN_TAG = "SummonCooldown";
    // 召唤冷却时间(召唤僵尸仆从最多每30s一次)
    private int summonCooldown = 0;

    public Necromancer(EntityType<? extends Monster> type, Level level) {
        super(type, level);
    }

    @Override
    protected void defineSynchedData() {
        super.defineSynchedData();
        entityData.define(SPELL_COLOR, -1);
    }

    public static AttributeSupplier.Builder createAttributes() {
        return createMonsterAttributes()
            .add(Attributes.MAX_HEALTH, 30)
            .add(Attributes.MOVEMENT_SPEED, 0.27)
            .add(Attributes.FOLLOW_RANGE, 24);
    }
}
接下来是实体每游戏刻的更新。
// 把更新summonCooldown的部分放在customServerAiStep是为了防止重复更新(如果直接放在tick中更新就会导致summonCooldown每刻更新两遍)
// 当然使用isClientSide的判断也是可以的
@Override
protected void customServerAiStep() {
    super.customServerAiStep();
    if (getSummonCooldown() > 0) {
        setSummonCooldown(getSummonCooldown() - 1);
    }
}

@Override
public void tick() {
    super.tick();
    // 渲染主手处的粒子效果,这里借鉴了唤魔者的有关代码
    if (level().isClientSide && isCastingSpell()) {
        int spellColor = getSpellColor();
        // 提取r、g、b值
        int r0 = spellColor / 65536;
        int g0 = spellColor / 256 % 256;
        int b0 = spellColor % 256;
        // 将r、g、b映射到[0, 1]区间中
        double r = (double) r0 / 255.0D;
        double g = (double) g0 / 255.0D;
        double b = (double) b0 / 255.0D;
        // 此处与唤魔者基本一致,因此不再赘述
        float len = yBodyRot * ((float) Math.PI / 180F) + Mth.cos((float) tickCount * 0.6662F) * 0.25F;
        float dx = Mth.cos(len);
        float dz = Mth.sin(len);
        // 判断是否是左撇子,以确定粒子效果的渲染位置(与唤魔者不同的地方是只会在主手处渲染粒子效果)
        if (isLeftHanded()) {
            level().addParticle(ParticleTypes.ENTITY_EFFECT, getX() + (double) dx * 0.6D, getY() + 1.8D, getZ() + (double) dz * 0.6D, r, g, b);
        } else {
            level().addParticle(ParticleTypes.ENTITY_EFFECT, getX() - (double) dx * 0.6D, getY() + 1.8D, getZ() - (double) dz * 0.6D, r, g, b);
        }
    }
}
然后处理亡灵召唤者的AI,我们使用两个Goal来实现亡灵召唤者的两种攻击方式,下面除为goalSelector添加的优先级为2和3的两个AI外,其余AI均为大多数非玩家生物通用的AI,因此这里不再赘述。笔者将在参考步骤 #3中详细分析这两个关键AI。
@Override
protected void registerGoals() {
    super.registerGoals();
    goalSelector.addGoal(0, new FloatGoal(this));
    goalSelector.addGoal(2, new NecromancerSummonGoal(this));
    goalSelector.addGoal(3, new NecromancerShootGoal(this));
    goalSelector.addGoal(6, new WaterAvoidingRandomStrollGoal(this, 1));
    goalSelector.addGoal(7, new LookAtPlayerGoal(this, Player.class, 8));
    goalSelector.addGoal(8, new RandomLookAroundGoal(this));
    targetSelector.addGoal(1, new HurtByTargetGoal(this));
    targetSelector.addGoal(2, new NearestAttackableTargetGoal<>(this, Player.class, true));
    targetSelector.addGoal(3, new NearestAttackableTargetGoal<>(this, IronGolem.class, true));
}
模型、渲染、音效与注册等部分都是重复性的工作,没有什么特殊的地方。唯一要注意的是需要在setupAnim中正确处理手臂的旋转。
@Override
public void setupAnim(Necromancer necromancer, float limbSwing, float limbSwingAmount, float ageInTicks, float netHeadYaw, float headPitch) {
    super.setupAnim(necromancer, limbSwing, limbSwingAmount, ageInTicks, netHeadYaw, headPitch);
    // 这里参考了唤魔者的代码,因此不多解释
    if (necromancer.isCastingSpell()) {
        if (necromancer.isLeftHanded()) {
            leftArm.z = 0.0F;
            leftArm.x = 5.0F;
            leftArm.xRot = Mth.cos(ageInTicks * 0.6662F) * 0.25F;
            leftArm.zRot = -2.3561945F;
            leftArm.yRot = 0.0F;
        } else {
            rightArm.z = 0.0F;
            rightArm.x = -5.0F;
            rightArm.xRot = Mth.cos(ageInTicks * 0.6662F) * 0.25F;
            rightArm.zRot = 2.3561945F;
            rightArm.yRot = 0.0F;
        }
    }
}
参考步骤 #3
这一部分是Necromancer的两个关键AI的实现。对于NecromancerSummonGoal和NecromancerShootGoal这两个AI,我们为其定义一个共同的抽象父类NecromancerGoal。
public abstract class NecromancerGoal extends Goal {
    private static final int DELAY_TICKS = 20;
    protected final Necromancer necromancer;
    @Nullable
    protected LivingEntity target;
    protected int ticksRemaining; // 施法时间剩余量(单位:tick)

    public NecromancerGoal(Necromancer necromancer) {
        this.necromancer = necromancer;
        // 亮哥子类的flags完全相同,因此这里把setFlags放在父类当中了
        setFlags(EnumSet.of(Flag.MOVE, Flag.LOOK));
    }

    @Override
    public boolean requiresUpdateEveryTick() {
        return true;
    }
}
然后来看一些关键方法。
首先看canUse和canContinueToUse,这里的meetExtraUseConditions稍后会用到。
@Override
public boolean canUse() {
    if (!necromancer.isAlive() || necromancer.getTarget() == null) {
        return false;
    }
    target = necromancer.getTarget();
    return meetExtraUseConditions();
}

protected abstract boolean meetExtraUseConditions();

@Override
public boolean canContinueToUse() {
    return super.canContinueToUse() && ticksRemaining > 0;
}
我们为canContinueToUse额外添加了一个ticksRemaining > 0的条件,以确保施法结束后AI可以停止执行。
接着是start和stop方法,此处为亡灵召唤者设置了施法时生成的粒子效果的颜色。
@Override
public void start() {
    super.start();
    necromancer.setSpellColor(getSpellColor());
    ticksRemaining = DELAY_TICKS;
}

protected abstract int getSpellColor();

@Override
public void stop() {
    super.stop();
    necromancer.setSpellColor(-1);
}
最后来看tick方法。
@Override
public void tick() {
    super.tick();
    // 看向目标进行施法
    if (target != null && target.isAlive()) {
        necromancer.getLookControl().setLookAt(target);
    }
    if (ticksRemaining > 0) {
        // 更新ticksRemaining的值
        ticksRemaining--;
        if (ticksRemaining == 0) {
            // 下面这行可以不要,因为Goal的执行逻辑确保了target变量不会为null,笔者此处是为了消除IDEA的警告才加上的
            Objects.requireNonNull(target, "Unexpected null target");
            performAttack(target);
        }
    }
}

protected abstract void performAttack(LivingEntity target);
在NecromancerGoal的子类中我们先来看NecromancerSummonGoal叭~ 除去performAttack的代码如下,因为比较简单易懂,所以笔者直接完整列出。
public class NecromancerSummonGoal extends NecromancerGoal {
    public NecromancerSummonGoal(Necromancer necromancer) {
        super(necromancer);
    }

    @Override
    protected boolean meetExtraUseConditions() {
        // 这里确保在要求3-i中提到的30s冷却时间内无法执行此AI
        return necromancer.getSummonCooldown() <= 0;
    }

    @Override
    protected int getSpellColor() {
        return 0x898F61;
    }

    @Override
    public void stop() {
        super.stop();
        necromancer.setSummonCooldown(Necromancer.MAX_SUMMON_COOLDOWN);
    }
}
然后是performAttack,此处笔者为了实现狭窄空间内能在较为正确的位置召唤僵尸仆从,所以部分代码较为复杂。
@Override
protected void performAttack(LivingEntity target) {
    RandomSource random = necromancer.getRandom();
    // 生成随机弧度与距离,为下一步确定生成位置做准备
    double randomRad = random.nextDouble() * Math.PI * 2;
    double distance = 1.5F + random.nextDouble() * 0.5F;
    double xOffset = Math.cos(randomRad) * distance;
    double zOffset = Math.sin(randomRad) * distance;

    // 以下12行代码均为对狭窄空间的处理
    Level level = necromancer.level();
    BlockPos pos1, pos2;
    for (int i = 0; i < 4; i++) {
        pos1 = new BlockPos((int) (necromancer.getX() + xOffset), (int) necromancer.getY(), (int) (necromancer.getZ() + zOffset));
        pos2 = new BlockPos((int) (necromancer.getX() - xOffset), (int) necromancer.getY(), (int) (necromancer.getZ() - zOffset));
        if (isBlocked(level, pos1) || isBlocked(level, pos2)) {
            xOffset /= 1.5;
            zOffset /= 1.5;
        } else {
            break;
        }
    }

    // 以下为常规的实体召唤流程,此处的代码保证了僵尸仆从能在关于亡灵召唤者对称的位置生成
    for (int i = -1; i <= 1; i += 2) {
        Minion minion = ModEntities.MINION.get().create(level);
        if (minion != null) {
            minion.moveTo(necromancer.getX() + xOffset * i, necromancer.getY(), necromancer.getZ() + zOffset * i, necromancer.getYRot(), 0);
            minion.setOwner(necromancer);
            // 此处finalizeSpawn不必要,因此未调用该方法
            necromancer.level().addFreshEntity(minion);
        }
    }
}

@SuppressWarnings("deprecation")
private static boolean isBlocked(Level level, BlockPos pos1) {
    return level.getBlockState(pos1).blocksMotion();
}
接下来看NecromancerShootGoal,同理先展示除去performAttack的部分。
public class NecromancerShootGoal extends NecromancerGoal {
    // 每隔0.6s发射一次凋灵之首
    private static final int ATTACK_INTERVAL_SMALL = 12;
    // 发射3次后有2s的较长间隔
    private static final int ATTACK_INTERVAL_BIG = 40;
    // 一共攻击3次
    private static final int MAX_ATTACK_COUNT = 3;
    // 当前的攻击次数
    private int attackCount;

    public NecromancerShootGoal(Necromancer necromancer) {
        super(necromancer);
    }

    @Override
    protected boolean meetExtraUseConditions() {
        return true;
    }

    @Override
    protected int getSpellColor() {
        return 0x101010;
    }
}
performAttack方法中通过“提示”部分提到的yRot方法来实现对凋灵之首发射的方向向量的旋转。
@Override
protected void performAttack(LivingEntity target) {
    double dx = target.getX() - necromancer.getX();
    double dy = target.getY(0.5) - necromancer.getEyeY();
    double dz = target.getZ() - necromancer.getZ();
    // 决定了是否发射(危险的)蓝色凋灵之首
    boolean dangerous = attackCount == MAX_ATTACK_COUNT - 1 && necromancer.getRandom().nextDouble() < getDangerousProbability();
    for (int i = -30; i <= 30; i += 30) {
        // 利用yRot方法旋转发射的方向向量,以实现散射的效果
        Vec3 direction = new Vec3(dx, dy, dz).yRot((float) Math.toRadians(i));
        WitherSkull skull = new WitherSkull(necromancer.level(), necromancer, direction.x, direction.y, direction.z);
        skull.setPos(necromancer.getX(), necromancer.getEyeY(), necromancer.getZ());
        if (dangerous) {
            skull.setDangerous(true);
        }
        necromancer.level().addFreshEntity(skull);
    }
    // 每次发射后累计攻击次数
    attackCount++;
    if (attackCount < MAX_ATTACK_COUNT) {
        ticksRemaining = ATTACK_INTERVAL_SMALL;
    } else {
        // 攻击满3次后充值attackCount
        attackCount = 0;
        ticksRemaining = ATTACK_INTERVAL_BIG;
    }
}

private double getDangerousProbability() {
    return switch (necromancer.level().getDifficulty()) {
        case PEACEFUL, EASY -> 0;
        case NORMAL -> 0.01;
        case HARD -> 0.2;
    };
}
到这里我们就做完了这种“恐怖”的生物,ta会不会令读者毛骨悚然呢?Maybe not...
源代码(Necromancer类)
源代码(NecromancerGaol类)
源代码(NecromancerModel类)
效果图
PS:该怪物的材质是笔者拿几年前曾经在练手mod中画的材质修改的,当时笔者的像素画水平十分糟糕(虽然现在其实也是www),甚至不懂得使用色板而在像素画中引入“无穷无尽”的颜色,所以尽管笔者后来已将其中的颜色量化,整体看上去可能依旧十分丑陋。但本教程并非像素画教程,因此别太在意材质上的不足吖~
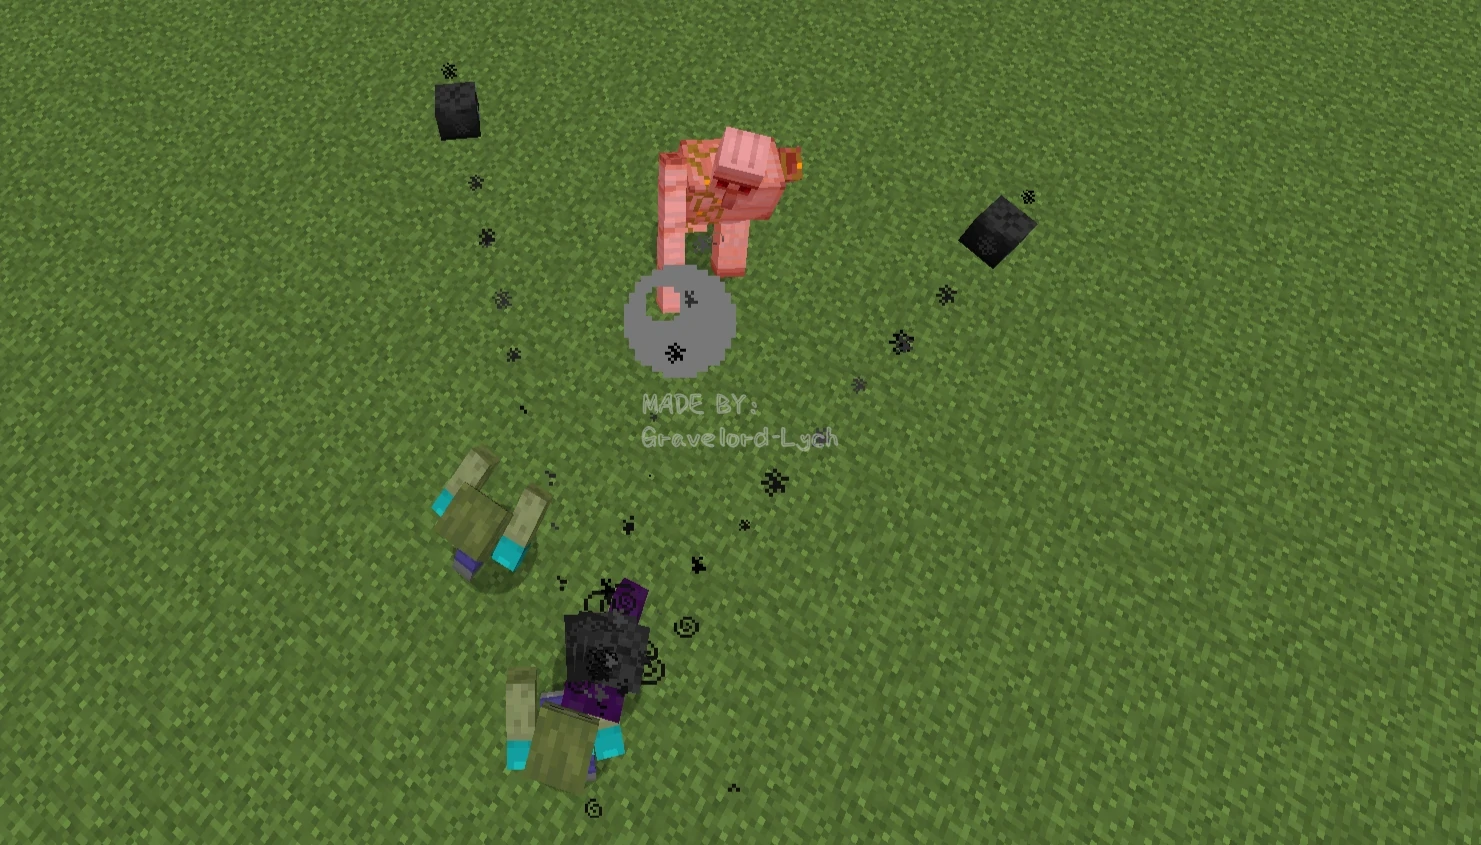
亡灵召唤者对战铁傀儡(俯视图)
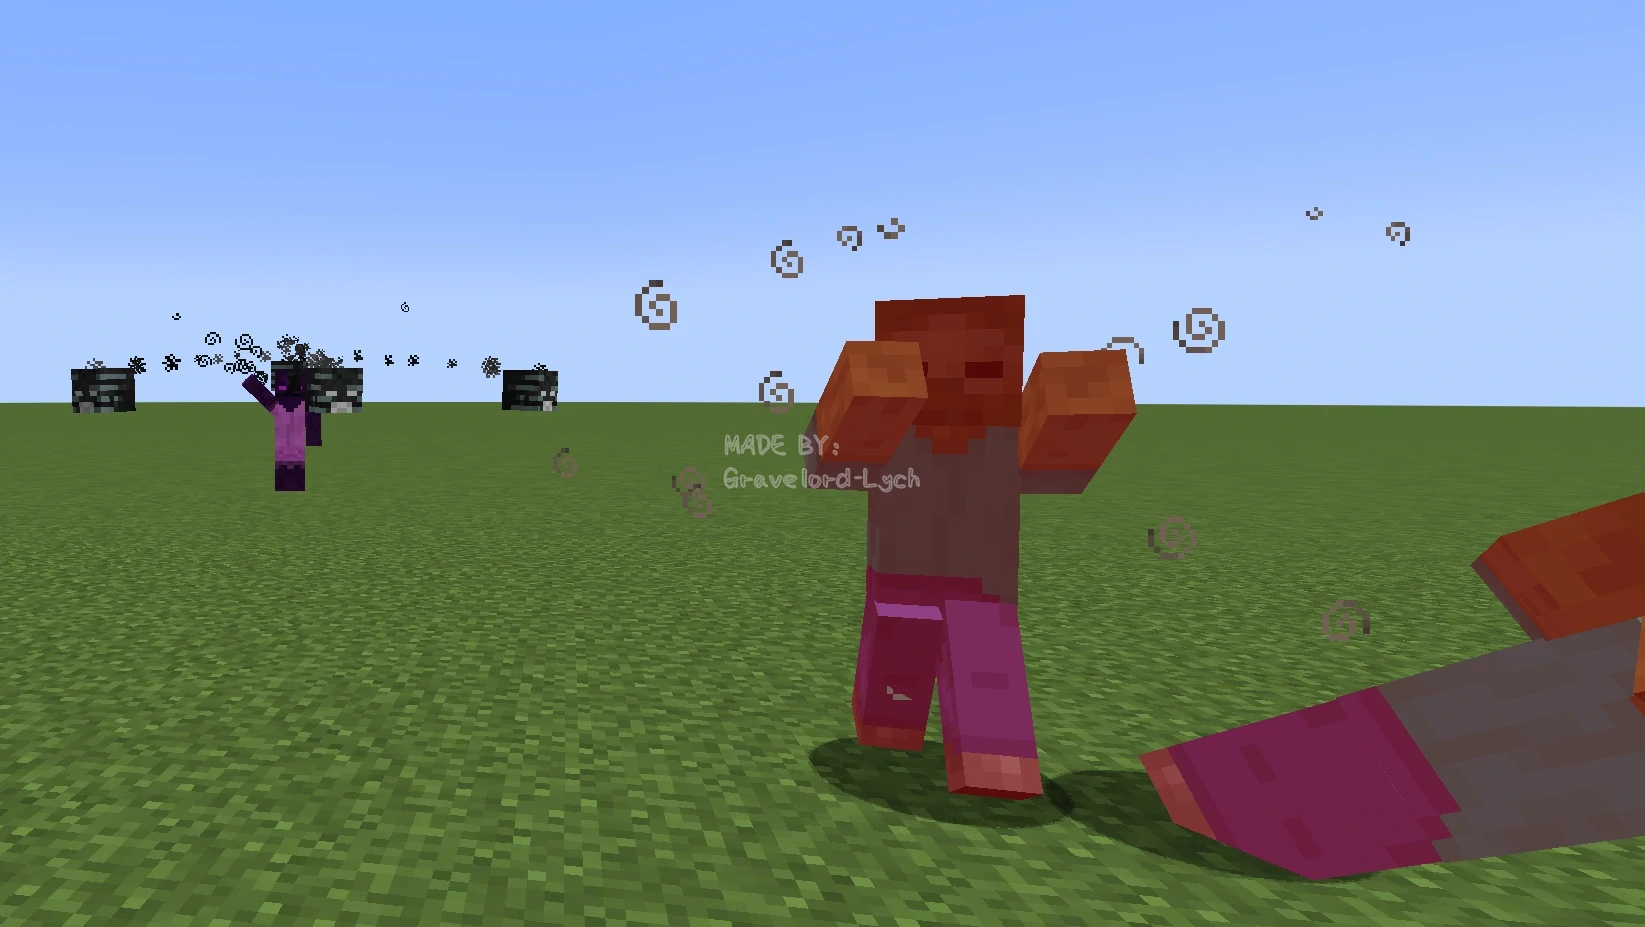
 亡灵召唤者对战玩家(玩家视角)
思考与练习
- 笔者发现亡灵召唤者发射的凋灵之首常常被其召唤的僵尸仆从挡住。能否让僵尸仆从对其主人发射的凋灵之首有一定的抗性?
- 能否让亡灵召唤者召唤出的僵尸仆从生成时具有随机正面状态效果?
- 能否让亡灵召唤者发射的每个单独的凋灵之首都有一定概率变为蓝色凋灵之首?
- 能否为亡灵召唤者创造一个更加scary的技能?